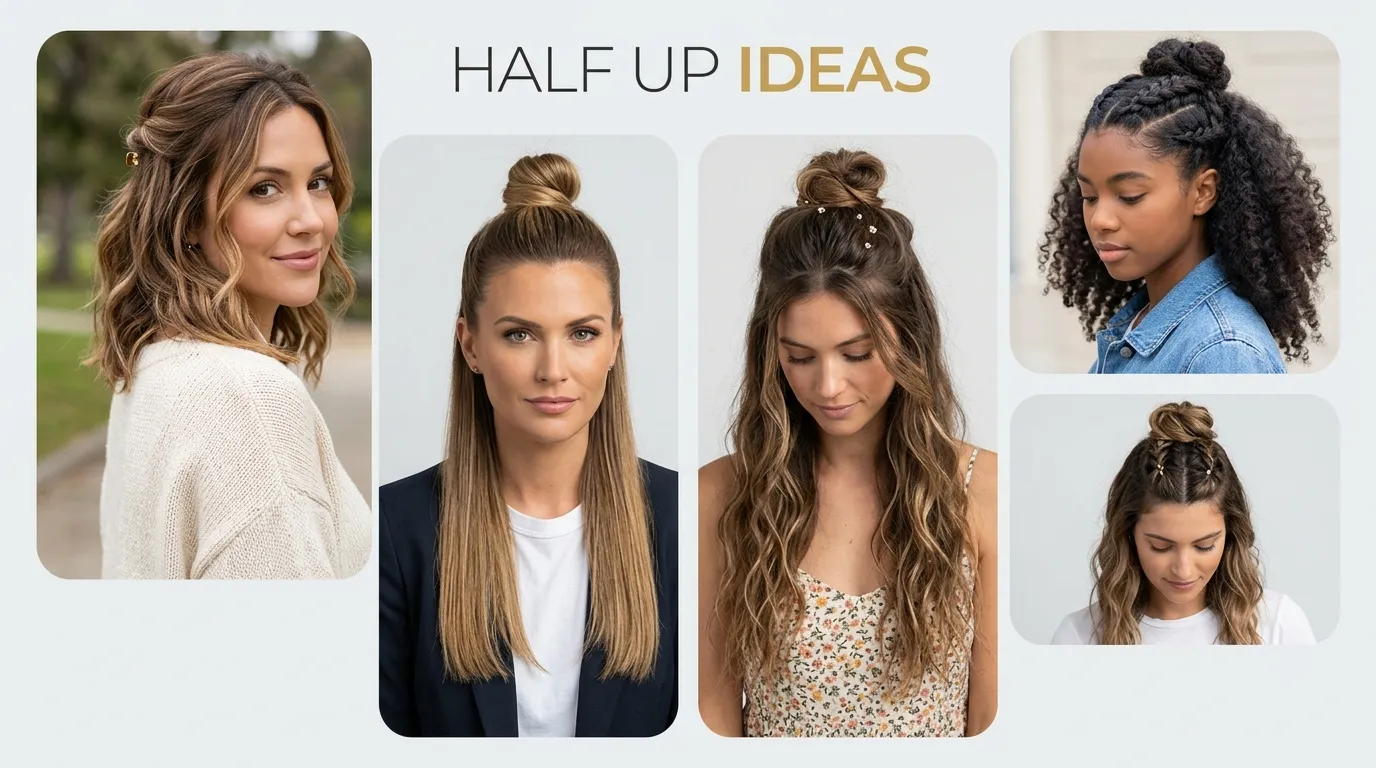
10 Half Up Ideas
A pretty hairstyle can change the whole mood of your outfit, especially when it feels easy enough for real life but polished enough for photos. That is why pulled-back hairstyles are so popular with Pinterest users in the USA. They work for school mornings, office days, bridal events, brunch plans, holiday parties, and casual weekends when you want your hair out of your face without hiding your length.
The beauty of these styles is flexibility. You can make them soft and romantic with loose waves, clean and modern with a sleek front, playful with bubble ties, or elegant with pearls and barrettes. You do not need a professional kit for most of these ideas. A few clear elastics, bobby pins, texture spray, curl cream, ribbons, clips, and lightweight styling products can create a hairstyle that looks saved straight from a Pinterest board.
Below are 10 practical, visually beautiful ideas you can recreate at home. Each one includes styling logic, useful materials, and real-life tips so the final look feels wearable, flattering, and easy to adjust for your hair type.
- Soft Crown Twist
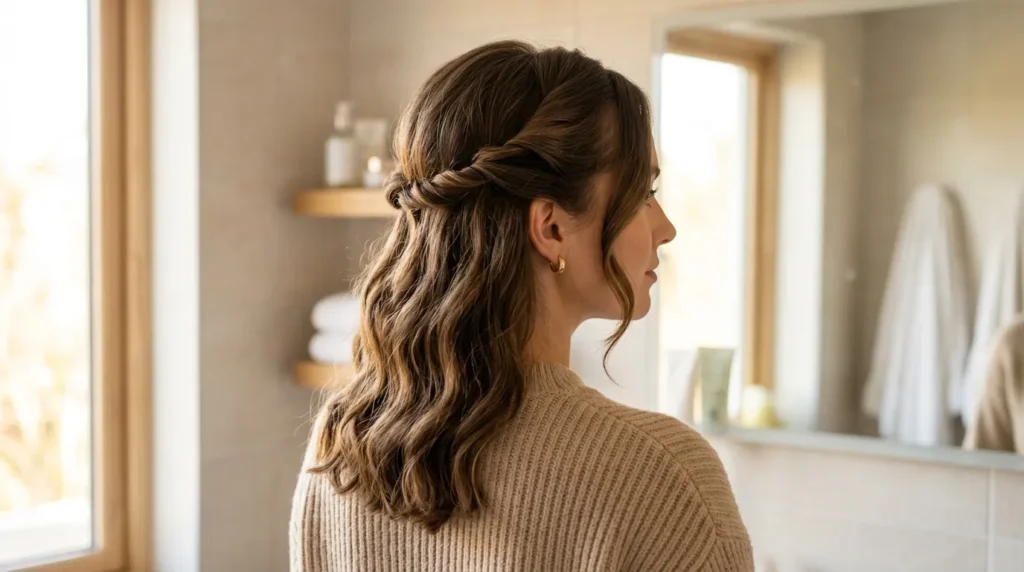
- Adds gentle height without making the style feel formal.
- Works well with loose waves, straight hair, or soft curls.
- Needs only bobby pins, light spray, and a smoothing product.
- Keeps front pieces controlled while leaving the length pretty.
A soft crown twist instantly makes everyday hair look intentional without feeling stiff or overdone. This idea works because it uses the natural shape of the crown to create gentle height, then lets the remaining length stay relaxed. Start by taking two small front pieces, twisting them away from the face, and pinning them together at the back with crossed bobby pins. A light texturizing spray helps fine hair hold the shape, while a smoothing cream keeps thicker hair polished around the hairline and prevents tiny flyaways in humid weather.
The finished look feels pretty enough for brunch, office days, baby showers, and casual date nights. It opens the face, adds softness around the temples, and keeps hair from falling forward while still showing off waves, curls, or a fresh blowout. In my experience, this style photographs beautifully because the twist creates visible detail from the side and back. Leave a few face-framing pieces loose, then gently pull the twist wider with your fingertips for a fuller, Pinterest-worthy finish that still looks touchable, wearable, and effortless in real life today.
- Ribbon Bow Finish

- Adds a soft, feminine accent without complicated styling.
- Works with satin, velvet, grosgrain, or organza ribbon.
- Hides elastics while creating a polished back view.
- Easy to match with dresses, sweaters, or casual basics.
A ribbon bow finish can turn simple pulled-back hair into something charming, feminine, and ready for Pinterest. The secret is choosing a ribbon that matches the mood of your outfit instead of grabbing any random tie. Satin feels polished, velvet looks cozy for fall and winter, and grosgrain gives a clean everyday finish. Secure the crown section first with a small elastic, then tie the ribbon over it so the bow sits flat. Keep the loops balanced, but not too perfect, for a softer handmade look that feels modern and personal.
This style brings instant personality because the accessory becomes part of the outfit, not just a hair tool. A black ribbon looks classic with a white button-down, while cream, blush, or dusty blue feels sweet for spring dresses and bridal showers. I’ve noticed this works especially well when the hair has a slight wave, because the bow looks more dimensional against soft texture. Use a tiny clear elastic underneath for strength, then let the ribbon handle the visual beauty while hiding the practical base completely from every angle beautifully.
- Braided Crown Detail
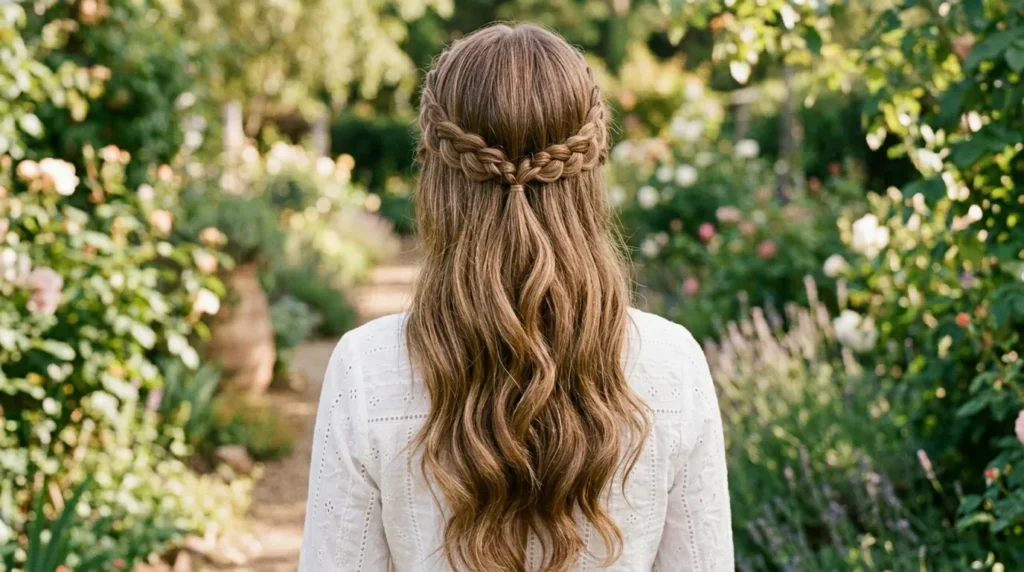
- Creates texture that looks detailed from the back and sides.
- Helps manage shorter layers around the face.
- Pairs beautifully with waves, curls, and soft blowouts.
- Uses simple braiding, clear elastics, pins, and flexible spray.
A braided crown detail gives pulled-back hair texture, structure, and a graceful shape that lasts for hours. This idea works because a small braid can act like a decorative anchor while the loose hair remains light and flowing. Take a section from each temple, create simple three-strand braids, then bring them toward the back and secure them together. Pancake the braid gently by tugging the outer edges, especially if your hair is fine. A flexible hairspray helps the braid stay soft instead of crunchy through busy days and warm afternoons.
The transformation is subtle but powerful because the braid adds craftsmanship without needing a salon appointment. It is a smart choice for school events, outdoor weddings, Thanksgiving gatherings, and summer trips when you want hair to stay in place. That’s why many stylists recommend small braids for layered hair; they control shorter pieces while adding detail. For a fuller finish, curl the loose ends with a large barrel iron, brush them out softly, and tuck pins underneath so the back looks clean in photos from every direction outdoors beautifully.
- Claw Clip Lift
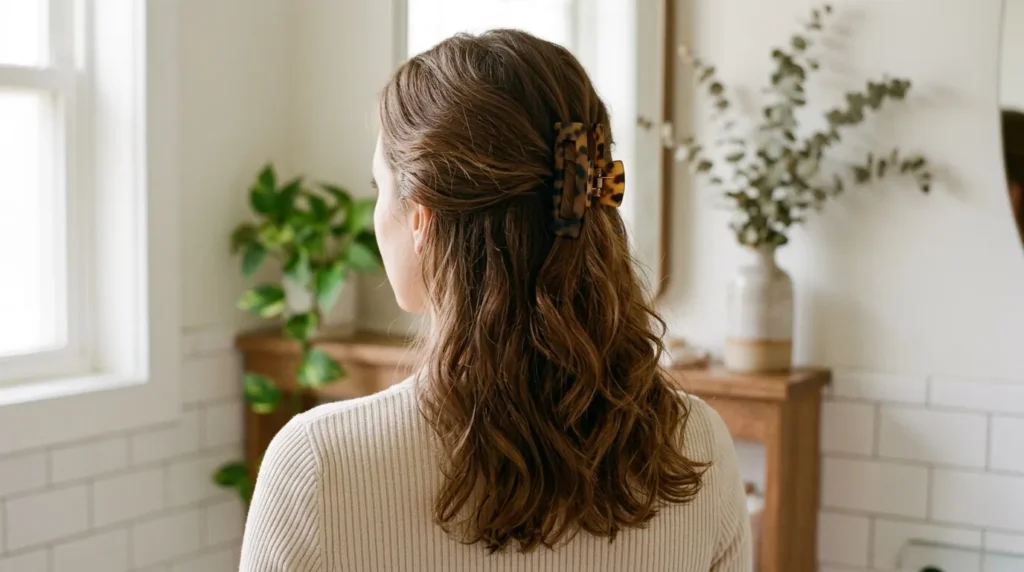
- Creates quick volume without using hot tools.
- Perfect for second-day hair and casual USA lifestyles.
- Works with matte, pearl, acrylic, or tortoise shell clips.
- Keeps the crown lifted while leaving the ends soft.
A claw clip lift is the easiest way to create volume while keeping the style relaxed and current. Instead of clipping all the hair up, gather only the top and side sections, twist them once, and secure them with a medium claw clip at the back of the head. The clip gives instant structure, while the loose length keeps the look casual. Choose matte neutral clips for everyday outfits, tortoise shell for classic style, or pearl clips when you want something softer and dressier for evenings and photos too today.
This idea is practical for busy mornings because it takes less than two minutes and still looks styled. It works especially well for second-day hair, when natural texture helps the clip grip better. I’ve seen this work well in many homes for quick school drop-offs, remote work calls, and weekend errands because it feels put together without heat styling. To avoid pulling, place the clip slightly higher than the occipital bone and let the ends fall naturally around the shoulders with movement and shape all day comfortably enough for errands.
- Mini Bubble Ties
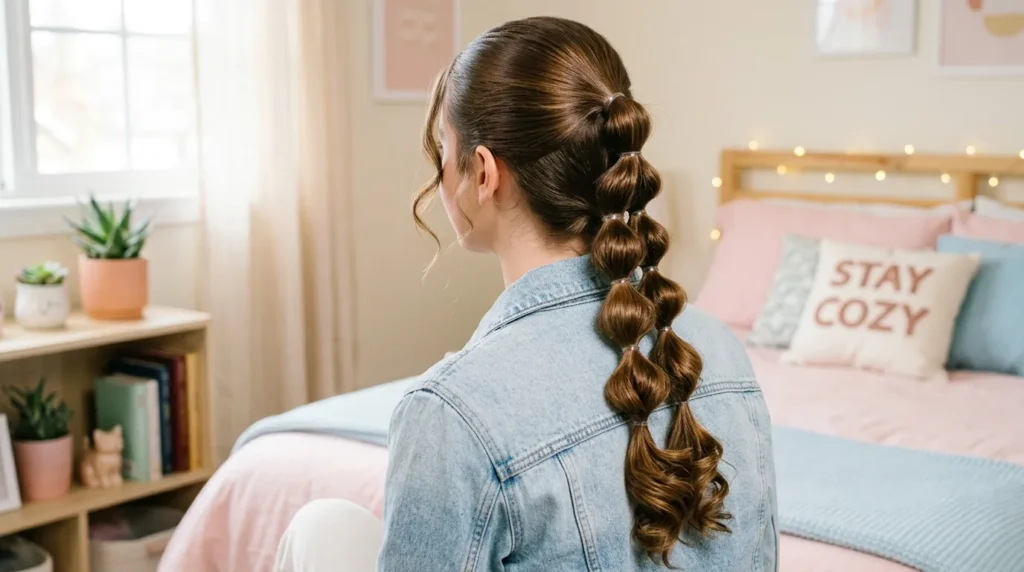
- Adds trendy shape without advanced braiding skills.
- Helps fine hair look thicker through gentle pulling.
- Uses clear elastics, smoothing brush, and lightweight oil.
- Great for casual outfits, school events, and vacations.
Mini bubble ties add playful texture while making the crown section look fuller and more styled. Begin by gathering a small top section and securing it with a clear elastic, then add another elastic an inch or two below it. Gently pinch and pull the hair between elastics until each bubble looks rounded. This technique works beautifully on medium and long hair because it creates repeated shape without braiding. Use tiny elastics close to your hair color if you want the bubbles to look seamless and neat from behind too.
The result feels youthful, trendy, and surprisingly wearable for casual weekends, concerts, game days, and summer vacations. It adds visual interest from the back, which makes it especially strong for Pinterest photos and short hairstyle videos. For a cleaner finish, smooth the top with a boar bristle brush before tying the first elastic. For a softer finish, pull out a few front strands and curl them away from the face. A drop of hair oil on the ends keeps everything shiny, fresh, and polished without weighing hair down at all.
- Loose Wave Pullback
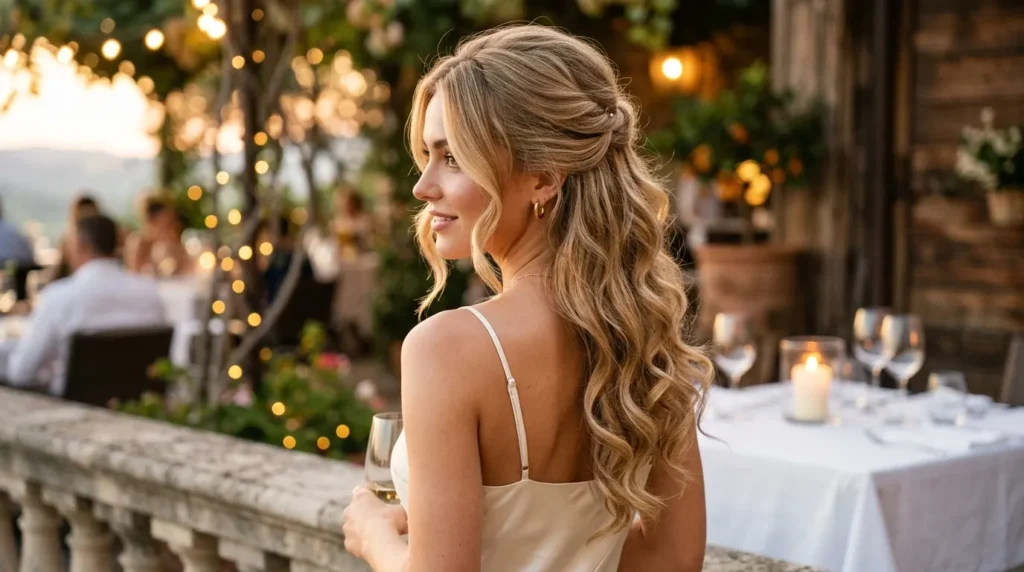
- Builds soft movement before the crown is secured.
- Best with large barrel curls, brushing, and texture spray.
- Creates a romantic shape without looking too formal.
- Works for dinners, holidays, engagement photos, and parties.
Loose wave pullback styling gives the hair movement first, then frames it with a simple lifted crown. Start by curling large sections away from the face with a one-and-a-quarter-inch iron, then brush through the curls once they cool. Gather the upper side pieces loosely, secure them at the back, and push the section upward slightly before pinning. This small lift keeps the style from looking flat. A dry texture spray adds grip, especially for silky hair that usually slips during long afternoons and outdoor plans in summer weather too easily.
This look works because it balances polish and ease, making it useful for dinners, holidays, engagement photos, and everyday outfits. The waves create softness, while the pinned crown keeps the face open and bright. In my experience, the key is not making the pulled section too tight; relaxed tension gives the style a romantic shape. Finish by curling the very front pieces lightly, then use your fingers to separate the ends so the hair looks full, airy, and touchable all evening without stiffness or frizz showing in photos later on.
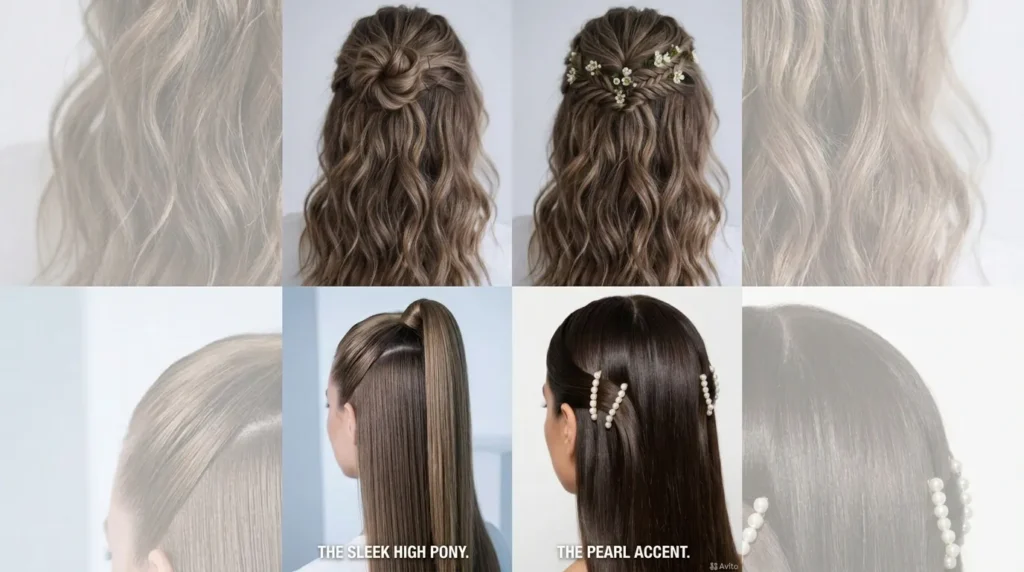
- Pearl Pin Accent
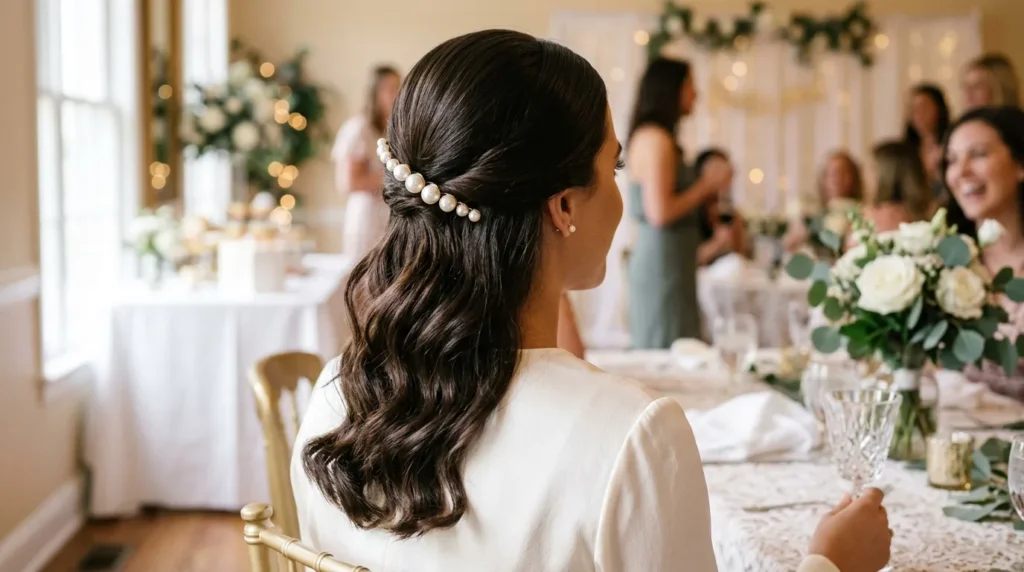
- Adds bridal softness or polished everyday detail.
- Looks best on smooth waves, curls, or glossy straight hair.
- Uses pearl pins, hidden bobby pins, and light finishing spray.
- Pairs well with pearl earrings, soft makeup, and simple outfits.
Pearl pin accents make a simple pinned-back style feel delicate, polished, and special without requiring complicated technique. After securing the top side pieces with bobby pins or a tiny elastic, place pearl pins along one side of the gathered section. Keep the spacing uneven but balanced, so the design feels organic rather than overly arranged. This idea works best when the hair has a smooth base, because the pearls stand out against shine. Use lightweight pins if your hair is fine or freshly washed, and mist lightly with spray first.
The finished style feels elegant enough for bridal events, church, graduations, holiday photos, and anniversary dinners. It also upgrades a basic sweater or simple dress because the pearls create a soft accessory moment near the face. Many designers recommend repeating one material throughout a look, so pearl earrings or a pearl-trimmed bag can make the hairstyle feel intentional. For daily wear, use three pins instead of a full cluster, and place them low enough that they sparkle without overwhelming the hair or feeling costume-like in daylight at all today either.
- Sleek Front Sweep
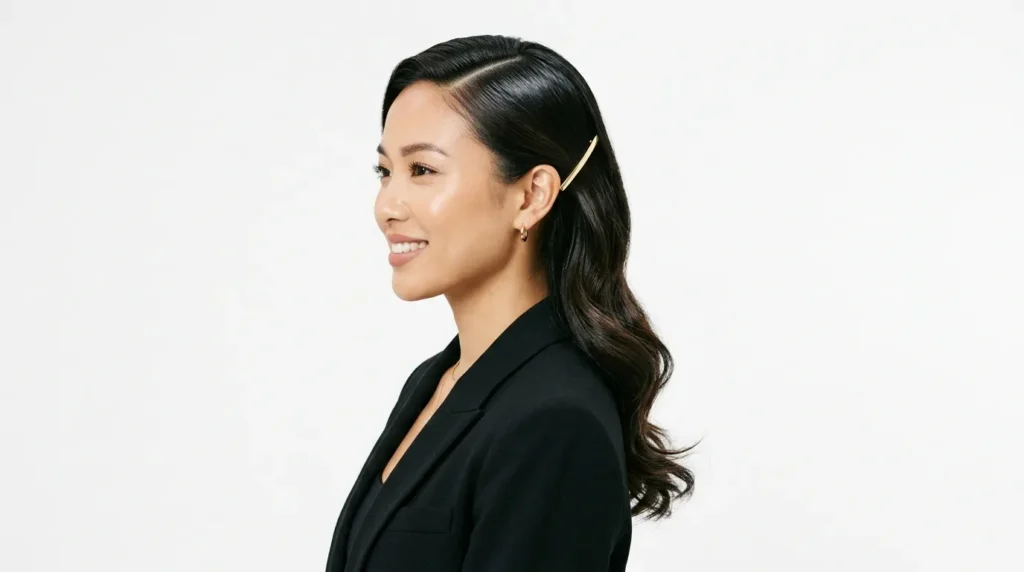
- Creates a polished face frame with minimal styling time.
- Works with side parts, middle parts, and smooth blowouts.
- Uses a fine-tooth comb, styling cream, pins, or a barrette.
- Great for work events, dinners, city outfits, and holidays.
A sleek front sweep gives pulled-back hair a clean, modern feeling that looks sharp with minimal effort. Create a deep side part or centered part, then smooth the front sections with a fine-tooth comb and lightweight styling cream. Secure the upper hair at the back with pins, a slim barrette, or a hidden elastic. The smooth front contrasts beautifully with loose lengths, especially when the ends are curled softly. This is a strong option when you want polished hair without a full updo for events or photos indoors today too.
The transformation feels confident and grown-up because the hairline looks controlled, shiny, and intentional. It works for office presentations, dinner reservations, city weekends, and holiday parties where casual texture may feel too undone. For best results, avoid heavy gel unless you want a wet-look finish; a flexible cream keeps the sweep soft enough to touch. Tuck one side behind the ear, add small hoops, and let the lower hair move naturally so the style stays elegant instead of severe all night in person and camera-ready too, always with balance and shine.
- Curly Crown Puff
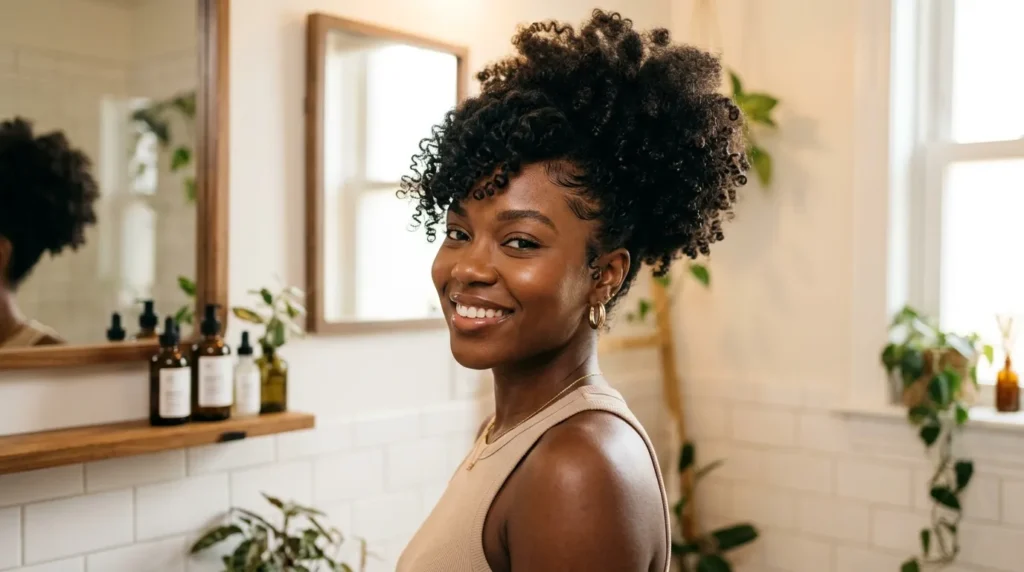
- Celebrates natural curl volume instead of flattening texture.
- Works with curl cream, refreshing spray, puff cuffs, or soft elastics.
- Keeps front curls controlled while leaving length full.
- Great for wash days, twist-outs, braid-outs, and refreshed curls.
A curly crown puff celebrates natural volume while keeping the front pieces lifted, shaped, and comfortable. Instead of flattening curls, gather only the upper front section loosely and secure it with a coil-friendly elastic or small puff cuff. Use curl cream or refreshing spray before styling, then lift the roots gently with your fingers. This idea works because it respects the curl pattern while creating a clear shape around the face. Avoid brushing dry curls unless you want extra expansion and frizz in the finished style later today outside too.
The result is bold, pretty, and practical for textured hair because it keeps curls visible instead of hiding them. It is perfect for natural hair, twist-outs, braid-outs, wash days, and refreshed curls between styling sessions. I’ve noticed this look becomes even better when the crown is not pulled too tightly, because softness keeps the shape flattering. Add edge control only where you want polish, then let the remaining curls fall freely for volume, bounce, and a confident everyday finish that lasts through real plans comfortably too, beautifully every time.
- Barrette Back Detail

- Creates instant polish with one visible accessory.
- Works with metallic, tortoise, pearl, or minimalist barrettes.
- Helpful for straight hair, blowouts, waves, and shoulder cuts.
- Hides practical elastics while keeping the back view clean.
A barrette back detail is perfect when you want shine, structure, and an accessory that looks intentional from every angle. Gather the upper side sections and secure them with a slim French barrette, metallic clasp, or decorative slide. The barrette should sit horizontally or slightly angled, depending on your part and face shape. This idea works because the accessory becomes the focal point, so the styling can stay simple. Smooth the crown lightly before clipping to avoid bumps under the barrette or uneven tension near roots after styling today too.
This finish is useful for women who want a polished hairstyle without curls, braids, or a lot of pins. It works beautifully on straight hair, blowouts, soft waves, and shoulder-length cuts because the barrette provides a clear shape. Choose gold for warmth, silver for cool outfits, or tortoise shell for everyday American classic style. If your hair is thick, secure the section with a hidden elastic first, then slide the barrette over it so the style feels stable all day without slipping or pulling at all during wear outside too.
Final Styling Notes
The best hairstyle is the one that fits your actual day, not just a perfect photo. For casual mornings, choose a claw clip, bubble ties, or a simple crown twist. For weddings, showers, holidays, and photo sessions, pearls, ribbons, braids, and soft waves create a more elevated finish. Always think about your hair texture first. Fine hair usually needs texture spray and gentle teasing, while thick hair often needs stronger pins, hidden elastics, or layered securing methods.
For Pinterest-friendly results, style near natural light and check the back view with a mirror before leaving. Small adjustments matter: loosen the crown, smooth the hairline, curl the face-framing pieces, or switch the accessory color to match your outfit. These small details make the final style look thoughtful, flattering, and easy to save for future inspiration.