10 Hair Tutorials Easy Ideas
Easy hairstyles are some of the most saved beauty ideas on Pinterest because they solve a real daily problem: wanting hair to look cute without spending half the morning styling it. For USA readers balancing school, work, errands, coffee runs, date nights, gym days, and weekend plans, a hairstyle needs to be realistic. It should look polished, but it should also work with normal tools, imperfect texture, and limited time.
The best easy styles are not always the most complicated ones. A clean bun, soft twist, simple braid, claw clip shape, or smooth ponytail can completely change your look when the placement is right. These ideas are designed to feel beginner-friendly, practical, and visually pretty. You can use them for casual days, office outfits, brunch plans, travel mornings, or last-minute events when you need something quick but still photo-worthy.
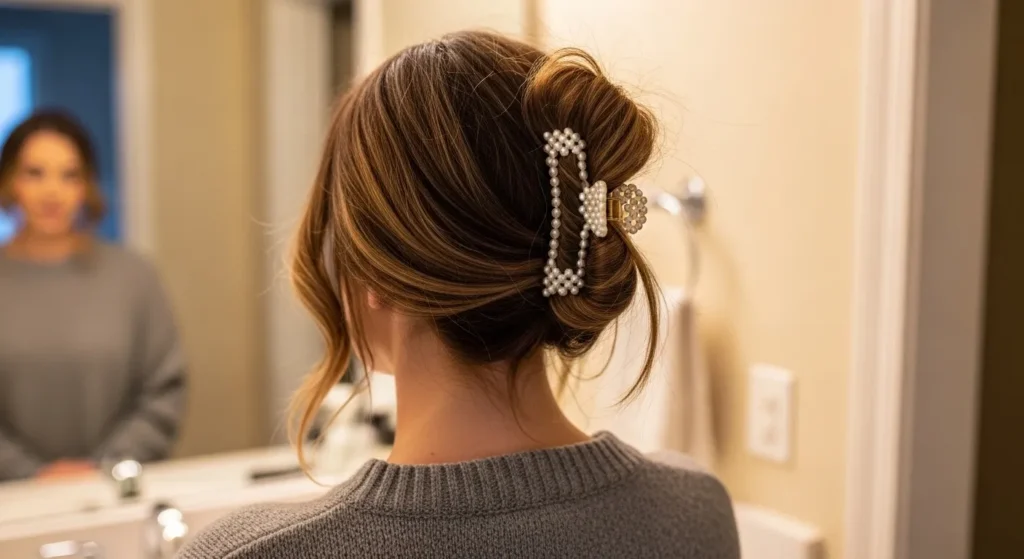
- Low Sleek Bun
- Creates a clean, polished look in only a few minutes.
- Works well for school, office days, errands, and dinner plans.
- Uses a brush, elastic, smoothing cream, bobby pins, and hairspray.
- Helps control frizz while keeping the neckline open and neat.
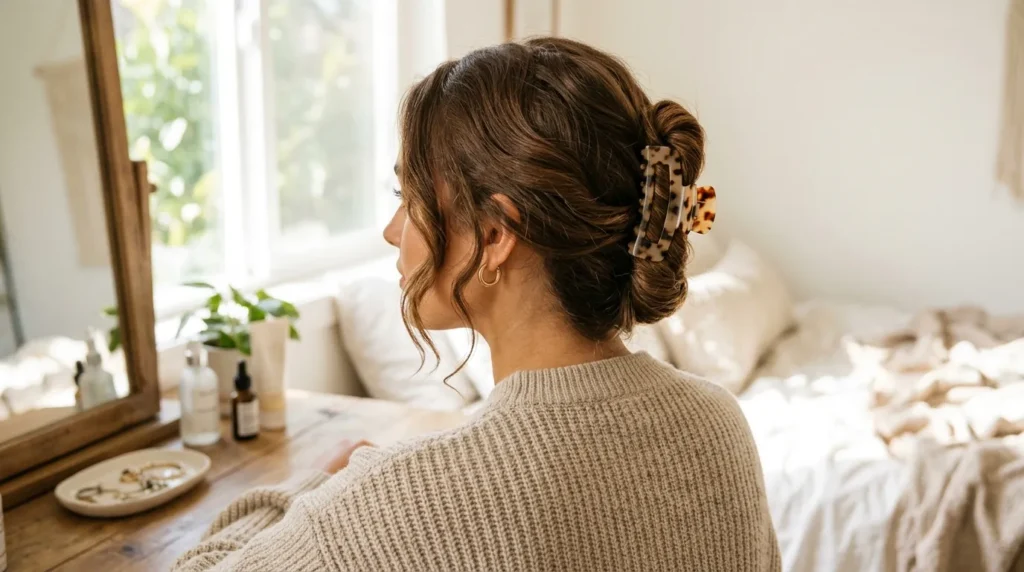
A low sleek bun is one of the easiest styles to master because it relies on shape, not complicated technique. Start by brushing the hair back or creating a clean middle part, then gather everything at the nape of the neck. Secure a low ponytail with an elastic, twist the length around the base, and pin the ends underneath. A small amount of smoothing cream helps control flyaways around the hairline, while flexible hairspray keeps the bun neat without making it look stiff or overly formal.
The finished look feels polished enough for work, school presentations, dinner, or a quick coffee meeting. In my experience, this style looks best when the crown is smooth but not overly flat. If your hair is fine, add a little texture spray before twisting so the bun does not slip. If your hair is thick, use U-pins instead of tiny bobby pins for stronger hold. Add small hoops or simple studs, and the whole style feels clean, modern, and wearable for everyday life.
- Soft Claw Twist
- Gives quick volume without needing heat styling.
- Works beautifully for second-day hair and casual mornings.
- Uses a medium claw clip, texture spray, and a smoothing brush.
- Keeps hair lifted while leaving soft pieces around the face.
A soft claw twist is perfect when your hair needs shape but you do not want a full updo. Gather the hair at the back of your head, twist it upward once or twice, then secure the center with a claw clip. Let the ends fall naturally over the top or down the back depending on your hair length. A medium matte clip works for everyday outfits, while pearl, tortoise, or gold clips make the same style feel more dressed-up.
The result looks relaxed but intentional, which is why this style works so well for errands, remote work, casual lunches, and travel days. I’ve noticed claw clip styles look better when they are not pulled too tight because softness creates a more flattering shape. Pull a few front pieces loose, smooth the crown lightly, and adjust the clip until it feels secure. Texture spray can help silky hair stay in place, while thicker hair may need a larger clip with stronger teeth.
- Bubble Ponytail
- Adds playful texture without needing braiding skills.
- Makes fine or thin hair look fuller with gentle pulling.
- Uses clear elastics, a brush, texture spray, and shine serum.
- Works for casual outfits, school days, concerts, and vacations.
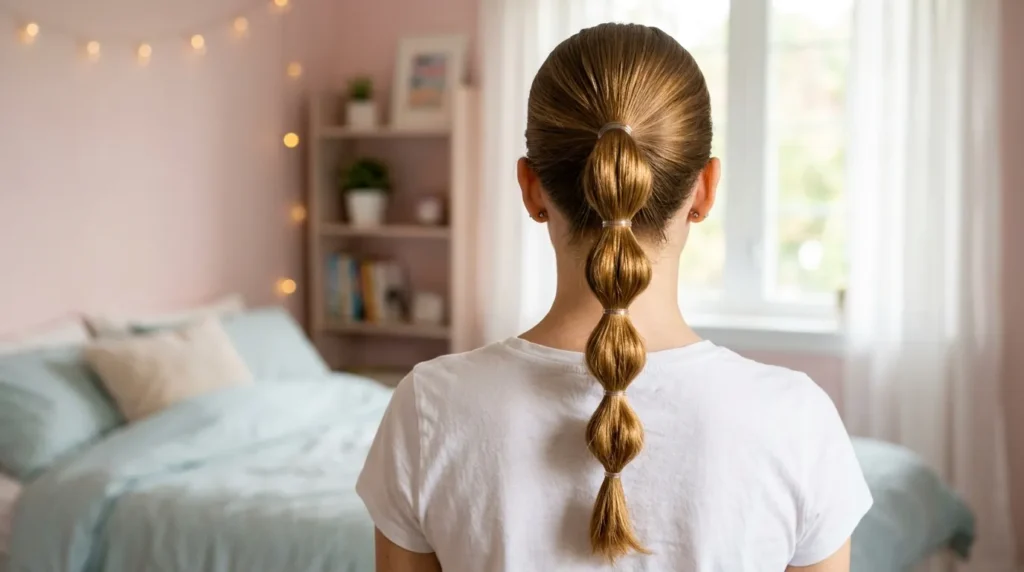
A bubble ponytail looks detailed, but the steps are simple enough for beginners. Start with a regular ponytail at your preferred height, then place small elastics down the length every two or three inches. After each elastic, gently pull the hair between the bands outward to create rounded bubble sections. The key is keeping each bubble similar in size so the style looks balanced. Use clear elastics for a clean finish, or choose colored bands if you want a more playful, sporty look.
The finished ponytail feels fun, secure, and practical for days when loose hair keeps falling forward. In my experience, bubble styles work especially well on medium and long hair because the repeated sections add visible shape. If your hair is fine, use texture spray before tying the elastics so the bubbles expand more easily. For a polished finish, wrap a tiny strand of hair around the top elastic. Add shine serum to the ends so the ponytail looks smooth, neat, and photo-ready.
- Braided Front Pieces
- Frames the face while keeping short layers controlled.
- Works with straight hair, waves, curls, and natural texture.
- Uses tiny elastics, light gel, a small comb, and texture spray.
- Adds a cute detail without styling the entire head.
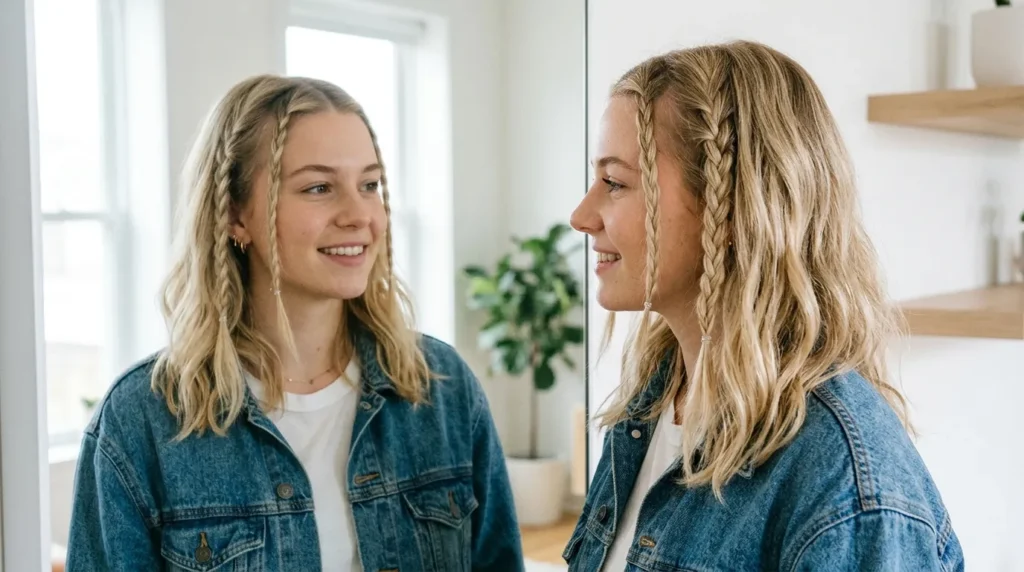
Braided front pieces are ideal when you want a quick style that still feels trendy and intentional. Part the hair where you normally wear it, then take two small sections from the front. Create simple three-strand braids on each side and secure the ends with tiny elastics. Keep the braids narrow for a softer look or make them slightly thicker if you want more of a statement. A little gel or styling cream near the roots helps keep baby hairs and flyaways controlled.
The finished look works because it adds detail around the face without requiring a full hairstyle. I’ve seen this work well with loose waves, straightened hair, claw clip looks, and ponytails because the braids create instant texture. If your hair is layered, braid gently and secure shorter pieces with a little spray. You can leave the rest of the hair down, tuck it behind the ears, or pull it into a low bun. The style feels youthful, easy, and perfect for casual Pinterest photos.
- Heatless Robe Waves
- Creates soft waves without using hot tools.
- Works overnight or during slow weekend mornings.
- Uses a robe belt, scrunchies, leave-in spray, and light mousse.
- Helps reduce heat damage while adding natural-looking movement.
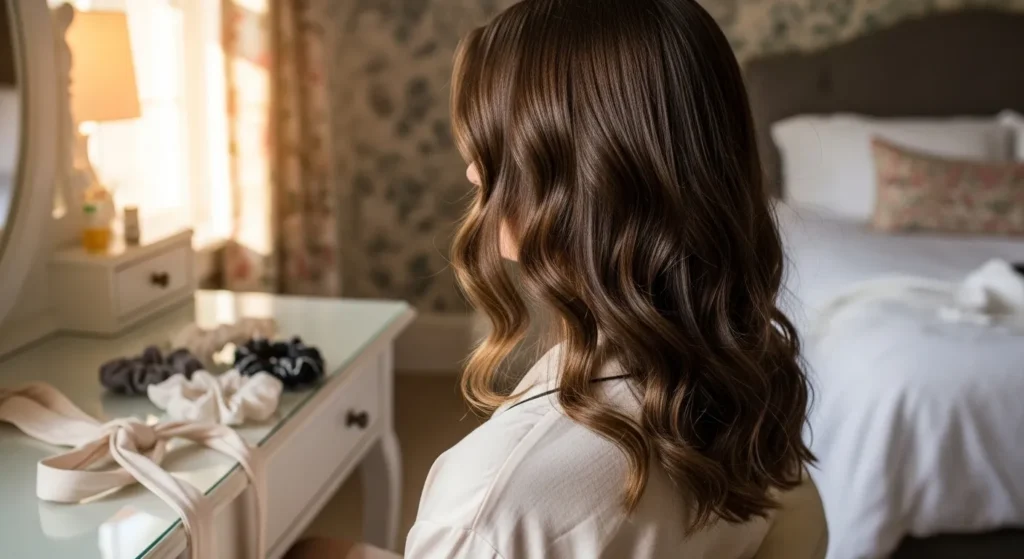
Heatless robe waves are perfect for anyone who wants pretty texture without a curling iron. Start with slightly damp hair, apply a small amount of leave-in spray or mousse, then place a robe belt across the top of your head like a headband. Wrap sections of hair around each side of the belt, adding more hair as you move downward. Secure the ends with scrunchies and let everything set for several hours or overnight. The softer the wrap, the looser the final wave.
The result feels effortless, romantic, and easy to wear for school, work, brunch, or casual date nights. I’ve noticed this method works best when the hair is not soaking wet because too much moisture can prevent the waves from drying fully. In the morning, remove the belt gently and separate the waves with your fingers instead of a brush. Add a light mist of flexible spray for hold. The final texture looks soft and natural, with less frizz and less heat stress.
- Messy Clip Updo
- Gives casual volume with a relaxed, undone finish.
- Works well for medium, long, thick, or layered hair.
- Uses a claw clip, bobby pins, dry shampoo, and texture spray.
- Perfect for busy mornings, errands, and second-day styling.
A messy clip updo is the kind of style that looks better when it is not perfect. Gather your hair loosely at the back, twist it upward, and clip it in place while allowing a few pieces to fall naturally. If your layers slip out, pin them softly instead of forcing everything into the clip. Dry shampoo or texture spray gives the roots more grip, especially on second-day hair. The shape should feel casual, lifted, and slightly undone rather than tight or formal.
The finished style is useful for real-life days when you want your hair off your neck but still cute. In my experience, the best messy updos have one intentional detail, such as smooth face-framing pieces, a pretty clip, or softly curled ends. That keeps the style from looking rushed. Choose a matte neutral clip for everyday wear, a tortoise clip for classic outfits, or a pearl clip for a softer feminine look. It is quick, comfortable, and easy to adjust throughout the day.
- Simple Ribbon Braid
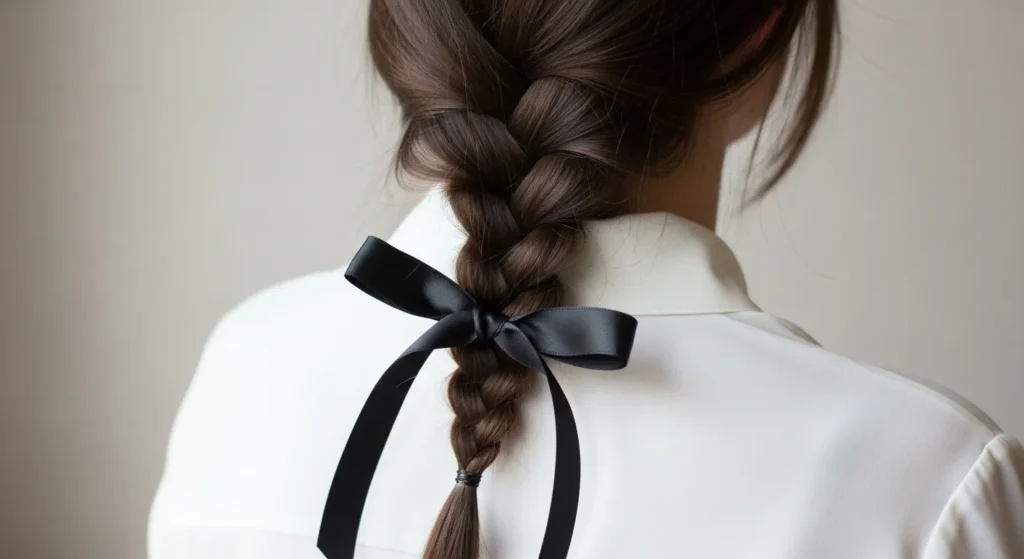
- Turns a basic braid into a softer styled look.
- Works with satin, velvet, cotton, or organza ribbon.
- Uses a hair tie, ribbon, brush, and light smoothing cream.
- Adds color, texture, and a pretty back-view detail.
A simple ribbon braid makes an everyday braid feel sweeter and more styled. Start by brushing the hair into a low ponytail or side ponytail, then tie a ribbon around the elastic. Divide the hair into three sections and let the ribbon blend into one section as you braid downward. Secure the end with a small elastic, then tie the ribbon into a bow. Satin feels polished, velvet feels cozy, and cotton ribbon gives a casual, cottage-inspired look.
The transformation is small but very noticeable because the ribbon adds color, movement, and personality. I’ve noticed this style works especially well for long hair, school outfits, picnic looks, and soft weekend styling. Keep the braid loose if you want a romantic finish, or braid tighter if you need it to last through a busy day. Match the ribbon to your sweater, dress, or bag for a coordinated look. This easy detail makes the hairstyle feel planned without adding much extra time.
- Polished Half Crown
- Keeps hair away from the face while showing length.
- Works with waves, curls, straight hair, and blowouts.
- Uses clear elastics, bobby pins, texture spray, and a small clip.
- Adds gentle shape for brunch, work, photos, and casual events.
A polished half crown is a simple way to make loose hair feel more styled. Take two small sections from the front, twist them away from the face, and secure them together at the back with a clear elastic or hidden pins. Keep the crown section loose enough to create softness, then gently tug the twists wider with your fingers. If you want more volume, lightly tease the crown before securing the sections. The rest of the hair can stay straight, curled, or naturally textured.
The finished style feels pretty, practical, and easy to wear for many occasions. In my experience, this look is especially helpful when your hair is freshly washed and keeps falling into your face. The pinned crown gives control while the loose length keeps everything feminine and relaxed. Add a small barrette, pearl clip, or ribbon over the elastic if you want a more decorated finish. This is one of those easy hairstyle ideas that looks good from the front, side, and back.
- Curly Puff Shape
- Celebrates natural volume while keeping curls controlled.
- Works with curl cream, gel, soft elastics, and edge brushes.
- Keeps hair lifted for school, work, errands, and casual events.
- Adds shape without flattening or brushing out curl texture.
A curly puff shape is quick, beautiful, and practical for textured hair. Start by refreshing curls with water, curl spray, or leave-in conditioner, then apply a small amount of curl cream where definition is needed. Gather the hair upward or slightly back with a soft elastic, puff cuff, or stretched headband. Avoid pulling too tightly because the goal is lift, not tension. Smooth the edges only if you want a polished finish, and let the curls stay full through the top.
The result feels confident and comfortable because it works with natural volume instead of fighting it. I’ve noticed curly puff styles look best when the front is shaped gently and the curls are fluffed with fingertips. Add edge control around the hairline for a clean look, or keep the edges soft for a more natural finish. This style is great for busy mornings because it refreshes texture quickly. A small scarf, gold cuff, or simple clips can make it feel more styled.
- Smooth Side Sweep
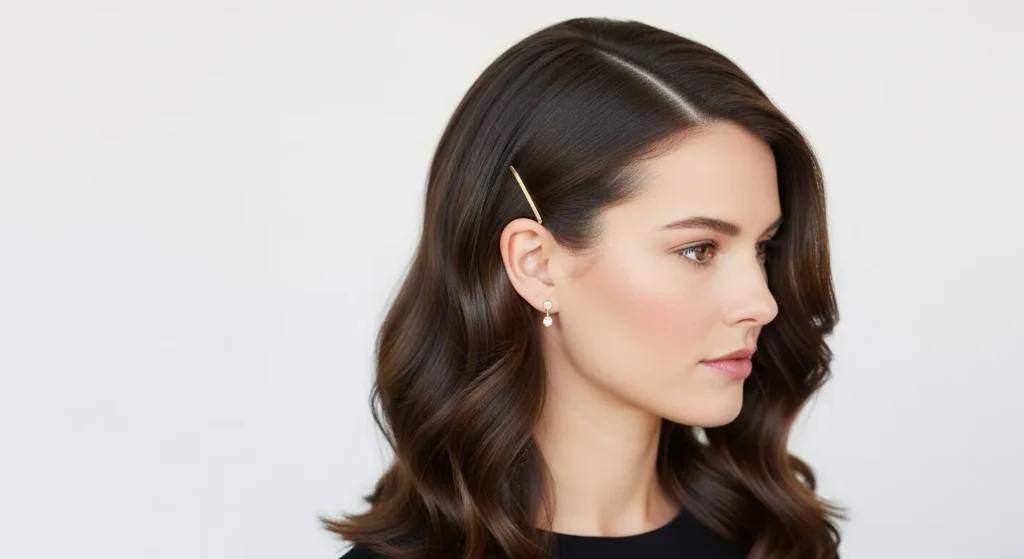
- Adds polish to loose hair without a complicated updo.
- Works with straightened hair, curls, waves, and blowouts.
- Uses styling cream, bobby pins, shine spray, and a fine comb.
- Highlights earrings, makeup, and one side of the face.
A smooth side sweep is an easy style that instantly makes loose hair look more intentional. Create a side part, then smooth one front section back toward the ear using a fine comb and light styling cream. Secure it with hidden bobby pins or a decorative clip. The other side can fall naturally with waves, curls, or straight texture. This works well when you want a polished face frame but do not want to tie all your hair back.
The final look feels clean, flattering, and useful for casual evenings, office days, dinner plans, or quick photos. In my experience, this style looks best when the pinned side is smooth and the loose side has movement. Tuck the hair behind one ear to show earrings, then add shine spray lightly through the ends. If your hair slips, cross two bobby pins in an X shape under the top layer. The style takes only minutes but looks calm, neat, and thoughtfully finished.